• PORTFOLIO
  • ABOUT
  • PRESS
  • SALON APPOINTMENTS

Rachel Messick

manicurist

  • PORTFOLIO
  • ABOUT
  • PRESS
  • SALON APPOINTMENTS

Moody Marble Nail Tutorial

Remember the Eighties Paradise nail tutorial that reminded you of your cool bachelorette aunt? Consider this her more masculine counterpart. We’re doing a different kind of marble today as we head into spooky season. A funky, rich, deep, black and gold moody marble worthy of the 1980’s wall street skyscraper lobby of our dreams.

Products Used:

Nail Thoughts x Kokoist Brush Set (Application, Detailer, Smoosh)

Kokoist Color Gel: E-188 Japanese Charcoal, E-206S Black Martini, E-1 Maxi White

Kokoist Art Clear

Kokoist Ultra Glossy Non-Wipe Top Coat Gel

Nail Labo Gold Foil

Joy Nail Gold Line Stickers

tags: pro tutorial, marble
categories: Pro Tutorial
Sunday 09.13.20
Posted by Rachel Messick
 

Relevant Resources: Favorite YouTube Channels

There are three things I can credit with my foray into manicuring: my own sad bitten nails, my friend and former manicurist Sreynin and YouTube tutorials. I specialize in gel nail art on natural nails, so I won’t be of much use in the acrylic department (although I hear that Nail Career Education, Naio Nails and Young Nails are amazing resources.)


The Nail Hub: Gel Nail Fundamentals

Liz has an AMAZING series called Gel Nail Fundamentals, literally everything from anatomy to application.


Hillary Dawn Herrera:

Hillary is just one of those magical unicorn people with a gift for education. I love that she talks business and real salon scenarios as well. If you want more in-depth skill training, she also has a paid digital education library (I highly recommend her Speed Gel Removal class).


Paola Ponce Nails

Paola specializes in Japanese gel nail education, and is a great resource for business, basics and art. She’s my go-to when I have a Japanese gel question.


Light Elegance: Jim McConnell’s Chemist Corner

I don’t use a ton of LE in my studio (mostly their glitter gels), however, Jim is a super renowned chemist. So if you are an education junkie like myself and you want to know the ins and outs of chemistry, take a stroll over to the LE channel and get nerdy with Jim.


Celina Rydén:

Celina just has the BEST personality, her videos have something for everybody whether it’s basics, business or advanced techniques.


Mainee Nail TV

Mai Sakai is a super well known Japanese artist and her tutorials breakdown simple and complex art, step-by-step complete with subtitles and royalty-free background music that’s for sure going to get stuck in your head.


Isabel May Nails:

Isabel is a more recent discovery of mine, but I just love her tutorials and British accent. Here’s one of my faves!


Nails by Katie Dutra

Katie’s channel is super fun, great and honest vlogs, necessary tutorials (hello ombré!) and product reviews.


tags: relevant resources
categories: Business Stuff, Pro Tutorial
Monday 08.03.20
Posted by Rachel Messick
 

Here We Go Again: California Closure, The Sequel

Welp. Here we are again. A second round of salon closures has swept pretty much every major county in Southern California. I feel oddly numb to it this time around, I’m sure in part because I’ve been watching the variance numbers in California steadily increase since the beginning of June and it’s been quite alarming. Everything has become politicized and Orange County (I’m looking at you Huntington) has become a hotbed for defiance of COVID spread prevention. When the bars and indoor dining opened up weeks ahead of nail salons, I had a feeling we’d draw the short straw. Ironically, these people that claim to be obsessed with the survival of small businesses, are behaving in ways that explicitly damage small businesses like mine. The TLDR is that as a sole prop and business owner it’s all immensely frustrating- like watching two cars speed toward each other, head on and in slow motion.

I’m not going to lie, the few weeks I was open- it was really different. Before the shutdown, I was booking out two months in advance (give or take a few mid-day appointments). Upon reopening I was limiting my appointments between 6-12 per week, justttt enough to keep the lights on. In addition to a smaller client load, I was getting cancellations left and right due to confirmed or potential COVID exposure. Many of my OG regulars were waiting until late summer to come back. It was pretty scary, but the reality of the virus was impossible to ignore. Maybe we’re just all operating at max tragedy, information overload and stress capacity. It seems that many in my field are convinced that they are invincible, due to what I can only assume is a splash of Barbicide, a touch of American exceptionalism and a prayer. This is all topped with the reality that unemployment resources are finite.

I’m a rule follower. It’s just my nature. I’ll rebel against misogyny and racism, but like, the speed limit- I feel guilty if I’m going 65 in a 60. My responsibility to uphold the laws and regulations as a state licensed manicurist-that’s not even up for debate. If I’m being honest, I feel torn. The first round of shutdowns, I was definitely on a high horse about saving money and preparing for the unexpected, but after 3+ months of a mandatory shutdown, people are nervous. We don’t know if this second round is going top last three weeks or three months. This time around, we’re a week in and I know very FEW salon professionals that have actually shut down and I’m pretty scared about it. I’m worried that the in the eyes of the legislature, it will continue to make us look unsafe and reckless. I’m worried that, even though I’m following the rules, that my business is going to be punished by those not following the rules.

As per usual there was loophole-friendly language in the new mandate and now salon pros are rushing to try to do services outdoors. Literally suggesting setting up tents in parking lots and alleyways like that’s going to save the industry. At what point do we acknowledge that pushing the limits and ignoring common-sense is what got us here and will inevitably keep bringing us back to this again and again and again. At what point do we acknowledge that active compliance is what will save our industry and non-compliance will be its demise?

I won’t be opening my studio in defiance of the state mandate. I’m sure as hell not going to do nails on the sidewalk. I don’t know. I don’t have a solution. We all need to do better to understand the who, what, why, where and how of our industry and legislature. We need to be better communicators and choose our words wisely when we communicate to said legislators.

But anyways, here we are. Will it be 3 weeks or 3 months? I don’t know. But I do know if I’m having these feelings, I can’t be the only one. If you want to show you care about small businesses, please wear a mask, get a test, stay home and be responsible.

Thursday 07.23.20
Posted by Rachel Messick
Comments: 2
 

Celestial Opal Nail Tutorial


It’s no secret I like my nail art simple, unique with some serious depth. Enter stage right, Celestial Opal, checking allllll the boxes. This look is beautiful as a full set on all ten nails or as an accent on a few. She’s versatile and universally flattering on EVERYBODY.

IMG_8355.jpg

This is another look that builds it’s depth with layers, starting with a milky base and layering in duo chrome flakes and gold filter foil like a sassy Opal inspired seven-layer dip of awesome.

I originally create this look for my client Missy, late last year and was super excited to add it to my press-on shop and now a step-by-step for you to recreate.

IMG_3174.jpg

Step 1: Prep and Base Coat, cure.

Step 2: Apply single layer of Presto Color Gel #3 and cure

Step 3: Leaving sticky layer in tact, add Kokoist Rainbow Mica and Nail Labo Foil Flakes, then tap and burnish Clou Good Fiber along the perimeter of the nail.

Step 4: Apply a coat of Kokoist Art Clear, give it a moment to self level and then cure.

Step 5: Add single coat of Presto Color Gel #180 and cure

Step 6: Leaving sticky layer in tact, burnish additional gold fiber to create depth

Step 7: Apply a thin coat of Kokoist Art Clear, give it a moment to self-level and then cure.

Step 8: Add a cuff around the top of the nail using Kimagure Cat Liquid Metal Gold gel and then cure for full 60 seconds.

Step 9: Apply Kokoist Ultra Glossy Non Wipe Top Gel and cure

IMG_1240.jpg


Products Used

Kokoist Bonding DUO in Bottle

Kokoist Ultra Glossy Non Wipe Top Gel

Kokoist Art Clear

Presto Color Gel #3 & #180

Kimagure Cat Liquid Metal Gold Gel

Kokoist Rainbow Mica R-2 Golden Purple

Nail Labo Foil Flakes Pink Aurora

Clou Gold Fiber


tags: Tutorial, stone nail art, gel
categories: Pro Tutorial
Monday 07.20.20
Posted by Rachel Messick
 

Relevant Resources: Invasion of the Pod(cast) People

I’m a firm believer that knowledge is better shared than stored away and I’m SO thankful that there are amazing educators, artists and business people who not only feel the same way but are upstartish enough to actually do the work and create (free!) resources for their colleagues. I’m super excited to share some of my never-miss-an-episode breakdown of my absolute favorite beauty business podcasts.


Outgrowth: A Slice of Pro Beauty

102940487_679962346117785_5788163434351450528_n.jpg

The Thriving Stylist Podcast

Britt Seva is a Hairstylist and former salon owner turned marketing genius. While the Thriving Stylist program is more geared toward hairstylists, all of the advice is completely relevant to manicurists. Britt is a great resource for building the business and clientele that you want and has a magical way of putting things into perspective.

Bangers:

Episode #115: How To Work With Brand Ambassadors or Micro Influencers This is an absolute MUST for everybody in the game, when is it really worth it to work with influencers? How do you figure out if a relationship is right for you AND how to do it the right way.

Episode #104: Close Your Books, Close Your Business: Is it ever a good idea to turn away potential clients?

Episode #78: Social Media Myths & Mistakes: Self explanatory title, but great tips to maximize your social media experience.


The Nail Hub (retired, but great resource)

TNH_Podcast_Square_Cover.png

Liz Morris is sharp, opinionated and exceptionally gifted when it comes to business. This is one fo the first nail podcasts I ever got into and I’ve probably listened to every episode three times. Although she’s moved her primary platform to YouTube (which I also highly recommend checking out) the podcasts episodes are still as relevant as ever, except maybe the one about Periscope.

Bangers:

Setting Prices: What actually goes into setting your prices. Are you just pulling numbers out of thin air or really thinking it through.

The Death of Licensing Pt 1 & 2: An honest discussion about deregulation looking at it from both sides.

Just Say No… And How To Actually Do It: Setting boundaries in business and with clients.


tags: relevant resources
categories: Business Stuff
Monday 07.06.20
Posted by Rachel Messick
 

Mask Plus Skin Equals S.O.S.: Essentials For The New Norm

IMG_0743.JPG

Masks are nothing new for me in my shop. Over the Holidays, I flew a little too close to the sun and the combo of no mask, nail dust and my asthma hit me HARD. I had an awful lingering cough for over a month, it was awful and to add insult to injury, it all went down during my busiest month of the year. Since I couldn’t (/wouldn’t) cancel on my clients’ holiday appointments and the doctor said I was ok to work, I had to learn to love a mask. While I could vibe with it, my skin, notsomuch and it was BAD. So bad in fact, I ended up having to go on antibiotics to clear my skin up because my lack of preventative care left me with a very embarrassing bacterial infection (tip: if you are finding that you’re getting clusters of breakouts, redness and your skin is warm to the touch- call your doctor).

Once my skin returned to homeostatis, I set out to find the best products to give my skin a fighting chance. There’s no doubt that since we’re in masks mandatory mode for the foreseeable future- you may be experiencing probs as well. I should preface this by saying, I’m not a skin care expert or an Estie. But I sure love to bug my favorite Esties, health care professionals and skin care experts all the time for product advice and questions. Thankfully with their input, I’ve been able to find a regimen that works for me.


GlyMed Plus Cell Protection Balm ($29)

Admittedly a super emollient balm may not be the first thing that comes to mind when avoiding breakouts but this literally saved my chin-skin. It gives the skin a nice barrier, not only against the friction of the mask but from the moisture caused by chatting, breathing or coughing into your mask while you’re wearing it.

Photo Courtesy of Glymed Plus

Photo Courtesy of Glymed Plus


GlyMed Plus Oxygen Treatment Cream ($57)

My Estie friend Mila put me onto this treatment and it’s become a staple of my evening routine. The oxygenating properties help decongest the skin and enforcing the cell’s detox process. It also has a really decadent soufflé texture that just makes my skin (theoretically) breathe a sigh of relief at the end of a long day in the studio.

Photo Courtesy of Glymed Plus

Photo Courtesy of Glymed Plus


Dr Brandt Oxygen Facial Flash Recovery Mask ($70)

Bubble masks were a thing like fie years ago, remember the crazy puffy charcoal masks? I’ve found a renewed need and interest in these as a treatment a couple times a week just to keep my skin clear. I like to use this in the morning on my days off just to give my skin that little extra pep and glow.

Photo Courtesy of Whitney Horton

Photo Courtesy of Whitney Horton


Kopari Coconut Detox Mask ($38)

Clay masks and my skin have a complicated relationship. I’m one of those combo-oily skin girls that prefers to engage with the oils in my skin (I use a lot of oils lol) vs attempting to eradicate them. Most clay masks just leave me feeling SO dry, depleted and tight. This mask is the perfect balance of my skin clarification and deep pore cleansing needs but with the added benefit of coconut oil and plant-based Squalane to keep the skin nourished and flexible. This mask is a good end of the week treat.

Photo Courtesy of Anthropologie

Photo Courtesy of Anthropologie


Khiel’s Cannabis Sativa Seed Oil Herbal Concentrate ($50)

One of my clients gifted this to me over the Holidays and it’s been an absolute god-send when my skin starts to give me problems. This oil is calming and non-comodegenic, it helps reduce inflammation, redness and calm down sassy skin.

Photo Courtesy of Skincare.com

Photo Courtesy of Skincare.com


Malin + Goetz acne treatment nighttime. ($22)

I’m 36 years old, I thought part of growing up meant that zits were dunzo. While it doesn’t happen too often in general, it’s happened more often since mask-wearing has become part of my daily life. I picked up this spot treatment last year when I was in London and it’s become an indispensable addition to my medicine cabinet. The combo of sulfur and salicylic acid really helps cut the lifetime of the occasional breakout.

Photo Courtesy of Malin + Goetz

Photo Courtesy of Malin + Goetz


Monday 06.29.20
Posted by Rachel Messick
Comments: 1
 

You Did Not Forget How To Do Nails: Going Back After Quarantine

This post contains affiliate links, see my disclosure statement here.

When COVID-19 hit California, personal care services were immediately shut down. What we initially thought would be 2 weeks, turned into three months. I am finally back in my studio full-time this coming week and I’m not going to lie, my feelings are mixed, for sure. I’m SO excited to see my clients, but I’m also 100% nervous and approaching every appointment and interaction in my life with extreme caution. We are still very much in the midst of a pandemic and taking clients right now is a major exercise in trust and communication. Here are some things that I’ve found made my return to the studio run smoothly.


Get Your Game Plan Together: 

Reread not only your state and national COVID precaution guidelines, but also review your state board laws and regulations as well. If we are going to be getting back to business, let’s make sure we’re compliant to everything- not just because we don’t want to get fined, but because taking those universal precautions keeps us and our clients as safe as possible. If you aren’t using a scheduling service (I use Acuity and I love it, here’s a referral link if you want to try it), be sure that you are getting and keeping a very detailed and easy to access schedule so that if you do have to do contact tracing, you aren’t leaving anybody out of the loop.

Masks, a touchless thermometer, hand sanitizer and disinfectant wipes are always at the ready and easily accessible.

Masks, a touchless thermometer, hand sanitizer and disinfectant wipes are always at the ready and easily accessible.


 Reassess Your Service Menu: 

Because I made the choice to cap the number of clients I see in a week, I decided to utilize the time to restructure my service menu. If there’s a service you hate or one that takes way too much time (i.e., removing Acrylic sets) consider taking it off the menu for a bit. I know that specialization may not be in the cards for all of us, but if there’s a service you dread, nows the time to reassess if you can. I typically offer complex nail art as an option, and I’ve temporarily taken it off the menu because of the time commitment. 

Communicate Clearly

Don’t let your expectations be a surprise for your clients. in addition to an email that I sent to every one of my clients, I also added a highlight to my Instagram stories about the changes, as well as two new intake forms to my Acuity scheduling process. The first breaks down new behavior and procedure expectations: (i.e., no additional guests, masks must be worn at all times, no cell phones on the manicure table, etc….) clients have to read through and confirm every guideline every time they book an appointment. The second form is a COVID-19 Waiver, based on a template that I got from The Outgrowth Podcast. These are in addition to my standard intake form. Trust me, any client that is annoyed or turned off by having to take these extra precautions, is probably a client best left behind. 

Copy of Copy of Copy of Social Media - Untitled Design 2.PNG
Copy of Social Media - Untitled Design 2.PNG
Copy of Copy of Copy of Social Media - Untitled Design.PNG
IMG_0681.jpg

 Do It For Real For Real:

This is for sure the most important point in this whole post- do it for real and not just for show. Our clients are depending on us to be compliant and to keep universal precautions FOR REAL. Regardless of whether or not you trust your clients to be honest or think COVID isn’t really a big deal, or if your one appointment is running over and you don’t want to make your next client wait for your disinfectant to reach its contact time requirements- do it right or don’t open. Period. Don’t lure clients into a false sense of security with a Barbicide certificate and a sneeze guard but not run disinfectant through your footspa or try to get one more use out of that pricey foam file because you just “barely used it once” - live every day like you are taking your State Board exam and the scary strict proctor is looking straight at you the whole time.

Certificate.jpg
Certificate-2.jpg
Rachel Messick - 2020-05-21.jpg

These certifications (above) are fine for refreshing your knowledge, anybody can take them, however, they do not immediately equal a compliant and clean salon.


Have A Dress Rehearsal:

The day I was permitted to take clients again in my state and county, I had my two best friends come in for services. Even though we have shared air throughout quarantine, I encouraged them to come in and with a critical eye, be brutally honest and to keep the same guidelines that I would expect out of my clients. Was there anything that made them feel uneasy? Were my directions easy to follow? Did they feel safe and secure? 

Give Yourself Some Grace: 

As artists, we all suffer from a bit of imposter syndrome- I’m telling you this right now and I need you to hear me, you did NOT forget how to do nails. You might be a little rusty and slow, plan for that, even it if means you can’t take as many clients per day or that appointment times will run a little late. That’s OK, give yourself some grace. When I did my aforementioned dress rehearsal, I was really slow- when I took clients the following day, I was much more in my groove.

Clear communication also includes gentle reminders throughout the studio.I printed these sweet signs here.

Clear communication also includes gentle reminders throughout the studio.

Talk It Out: 

Remember when I told you to build a nail community- this is where that comes into play. Chances are your fellow manicurists are feeling the same stresses, some may be in other states that opened earlier, some may still be closed. It’s SO important to find your nail family- they are truly an invaluable resource. 

Take Your Time: 

Let me preface this by acknowledging that I understand that not everybody has the privilege to voluntarily not work. If you aren’t feeling great, it’s ok to stay closed longer. If you haven’t been able to get your hands on the PPE you need to keep yourself and your clients safe, don’t open yet. It’s ok to take more time if you need it and can afford to do so.

tags: Business, reopening
categories: Business Stuff
Thursday 06.25.20
Posted by Rachel Messick
 

Always Amethyst Nail Art Tutorial

Stone and gem inspired nail art are MAJOR. It’s a trend that seems to continuously reinvent itself month after month. During the Spring and summer, clients want Rose Quartz and Amethyst, Tigers Eye and Black Opals for Halloween and the winter holidays mean opals, jade and marble. The good news is, once you figure out a few different variations in this technique, you can pretty much do anything.

Stone inspired nails are a great entry point into the world of nail art for clients and manicurists alike. Creating stone art (like most of the art I do) is an exercise in thinking through your layers before you start. For this look we’re using a milky semi-sheer lavender base with a shock of a custom purple jelly blend throughout. We add dimension with mica flakes and create stylized veins with a super pigmented white art gel and bring it all together with top layer of sheered out white lavender.

Some notes on the white veins, wipe your brush frequently on your palettes that it doesn’t drag too heavily throughout. Be sure to flash cure or fully cure between completed veins, especially if they are touching or overlapping.

Here are some links to the products I used to create this look:

Presto Color Gel #178

Presto Color Gel #180

Ageha Sharp Liner White

Kokoist E-204S Violet Fizz

Kokoist E-227S Licorice Jelly Beans

Kokoist Rainbow Mica Flakes R-2 Golden Purple

Kokoist Art Clear

Presto #6 Square Brush

Presto #11 Fine Point Brush

Kokoist Ultra Glossy Non Wipe Top Coat Gel

tags: pro tutorial, stone nail art
categories: Pro Tutorial
Monday 06.22.20
Posted by Rachel Messick
 

Toasted Ceramic Tutorial

I was excited to recreate this design (it’s inspired by my Palm Springs press on design) with an updated look utilizing one of the new Presto Sand Collection colors (slightly deeper, but I’m into it). 

Ceramics have been a longstanding source of inspiration for me. My parents fancied themselves artistic types, so our house was fairly eclectic with lots of art on the walls and on the shelves.  When I set out to create some ceramic looks for my shop, I kept being drawn to these rustic turquoise pieces- but, me being me, I had to give it some flair and add gold foil.

Untitled Design 4.PNG

While I can’t say that this design was inspired by a particular real ceramic or glazing technique, it definitely gives me chill desert art teacher vibes which I’m totally here for.


Step 1

Step 1

Lay down your base gel. The shade I’m using is a bit sheer, so it took me three coats to achieve my desired opacity.

Step 2

Step 2

After curing your base color, add a sheer butterscotch shade focusing on the area who want the most intensity and feathering into a diagonal gradient.

Step 3

Step 3

Add a sheer brown on top of the sheer butterscotch, once again, focusing on your point of intensity and feathering out. It doesn’t have to be perfect.

Step 4

Step 4

Add a dark black-brown to the furthest edge to create the deepest point in your gradient. Wipe the excess gel off of your brush and gently feather into the jelly brown.

Step 5

Step 5

Keeping the inhibition layer sticky, gently press gold foil into your design. After you are done top with a matte or glossy top gel and you’re done!


Products used: 

Presto Gel #304

Vetro No. 19 #261 Jewel Topaz

Vetro No. 19 # Jewel Umber

Kokoist Color Gel E-223 Midnight Chocolate

Nail Labo Gold Foil

Presto Matte Top Gel 

Riccagel Color Brush

Mana Nails X Nail Partner Flat Brush

Monday 06.15.20
Posted by Rachel Messick
 

Watch Me Work: Amber Tortoise

Did you ever wonder how these gorge mutli-dimensional tortoise shell nails came to be? Watch me work and see how it all comes together.

View fullsize  Start with a sheer butterscotch shade, do not cure.
View fullsize  While the layer is still wet, add a sheer brown gel and let it settle into a nice amber pattern and then cure.
View fullsize  Add splotches of chocolate brown
View fullsize  Add offset black splotches and black dots, cure.
View fullsize  Add another layer of sheer butterscotch gel, cure.
View fullsize IMG_0437.jpg
tags: tortoise shell, pro tutorial, watch me work
categories: Pro Tutorial
Thursday 06.11.20
Posted by Rachel Messick
 

Things I Wish I Knew: Advice for New and Aspiring Manicurists

IMG_2521.JPG

1. Nail School Is Not the Real World: 

 The goal of nail school is for you to finish nail school. Period, end of story. 

 It’s to teach you the basics of the Milady text and to help you pass the state board. Some schools offer upgraded programs (my school had the basic 400 hours and then an advanced 600 hours)- don’t waste your time, just take the basics. Connect with your instructors;  ask questions and pay attention,  usually if they see you are serious and interested they will invest more in you. One of my instructors, Jackie, was absolutely instrumental and crucial to me passing the State Board exam and I still consider her a friend. 

 Another thing to consider,  it’s not uncommon for cosmetology instructors to be scouted as students and put straight through an instructor program as soon as they graduate. It stands to reason, you could have an instructor with very limited real-world salon or business experience. 

 You’re better off investing the money you didn’t spend upgrading your program on great, focused and refined education taught by professional artists and educators (more on that below). In additional to the amazing (and FREE) resources available on the internet there are also many reputable in person one-on-one educators and brand/technique certifications.

That being said, nail school is GREAT for learning how to interact with clients. Do yourself a favor and let it be known to your instructors that you WANT to work with clients. 

A standard mock State Board Practical Exam set up.

A standard mock State Board Practical Exam set up.


2. The Learning (And Practicing) Never Stops: 

Don’t get it twisted, in the beauty biz we are lifelong students. There will always be new products and techniques to master and ways to be better. However, it is SO important to do your research, ask your peers about the classes they’ve taken and their opinions on them. It’s surprisingly easy to weed out the duds if you just take the time to chat with your peers. I can personally vouch for several programs and educators, if you’d like to see that in a future post let me know in the comments! 

IMG_9522 2.JPG


3. Build A Community:  

There is room for everybody at the top. While it’s natural to feel competitive, comparison is the thief of joy. You won’t be everybody’s cup of tea and everybody won’t be your cup of tea- don’t force it. it’s important to be a part of a like-minded community. I love that I have an amazing world-wide network of fellow manicurists that I can bounce ideas off, give advice to or ask for advice from. Nail friends just make everything better. 

Taking classes are a great way to meet fellow manicurists AND to learn new skills- WIN WIN! This picture was taken at Katie’s Masterclass and I now count all of these ladies as friends! Left to Right: Sandy (@beachgirlmani), Katie (@nailthoughts), B…

Taking classes are a great way to meet fellow manicurists AND to learn new skills- WIN WIN! This picture was taken at Katie’s Masterclass and I now count all of these ladies as friends! Left to Right: Sandy (@beachgirlmani), Katie (@nailthoughts), Brittany (@nailsnybrittany), Gwen (@hausofglewis_nails) and me (@rachel.messick) featuring some very dusty pants.

4. Buy It Nice or Buy It Twice:

Not to be like, a super snob but please don’t buy weird gel off amazon- if a gel is $1, that’s exactly what it’s worth. It doesn’t matter if you can get 100 colors for $50, most of that product is of questionable origin and can cause some serious allergic reactions. Product allergies are VERY real and can end your career QUICK. Buy from reputable brands that can provide you with SDS/MSDS sheets that can vouch for their product.

5. Products Are Not a Substitute for Skill:

If they were, we would all be out of a job. Remember the first time you did a gel manicure- yeah, it’s a LOT harder than it looks, it probably took you two hours and fell off the next day in the shower. There is no product in the world that will make you a good nail artist. There are products that can simplify certain tasks. There are products and tools that can elevate the work of a good artist. There is no substitute for skill. 

I traveled a state over to take this class- when the educators are amazing it’s WORTH it. This was a joint Erica’s ATA & Luminary Certification with Candice Green and Hillary Hererra.

I traveled a state over to take this class- when the educators are amazing it’s WORTH it. This was a joint Erica’s ATA & Luminary Certification with Candice Green and Hilary Hererra.


6. People Skills Matter:

People are the heartbeat of our profession- it’s imperative to learn how to read the room, when to speak, when to listen and how to navigate a conversation. Chances are, if you choose this profession, you probably like people- so you’re already halfway there.  


7. How You Represent Yourself Matters:

We live in a different world today; your image consists of much more than your outfit. It’s about an experience. Keep things consistent every space that you represent yourself. We have more access to each other than ever- be yourself and have fun but keep it intentional and professional. You never know who’s watching. I highly recommend keeping separate personal social media pages and choosing very wisely who you allow into that space. 


Very engaging Young Nails One Week Course

Very engaging Young Nails One Week Course

 8. Know your Cost Per Service:

Don’t base your prices on what the salon down the street is charging. Know how much it actually costs you to perform a service, what you’d like to make an hour and your overhead. You can definitely look at what other artists are doing and how they structure their services, but at the end of the day you need to do what makes the most sense for YOU.

9. Create Boundaries:

Clients are not bad or naughty, however, it’s important for your well-being that boundaries are set and respected. People treat you how you allow them to. Do not, I repeat, do NOT wait to set personal and professional boundaries. Scheduling, safety guidelines, contact guidelines and preferences, late fees, no show fees, etc.…  You’d be surprised how much mutual respect is achieved when you set boundaries.

ACS_0002.JPG

 10. The Beauty Business Is Still a Business:

It does not matter if you are an employee or a business owner, the only person who is responsible for YOUR business is YOU. That means making sure you know the ins-and-outs of the state and local guidelines/laws. That you are saving money for taxes and managing your business expenses. Get an EIN and a business checking, savings and credit card. Make sure you have appropriate liability insurance. Read all the fine print. Know your rights. Don’t get taken advantage of by shady salon owners.This business is the BEST, but it is a BUSINESS- don’t EVER forget that. 


11. Don’t Be Afraid to Blaze Your Own Trail:

There are a lot of veteran manicurists with very strong opinions, some antiquated, some not. That’s ok. There are vets that won’t touch a product, no matter how good it is, if the product is retailed to the general public. There are vets that believe you should only use one and only one product line. There are vets that believe that hand-filing is the only way to file. This is an ever-changing industry and there is much to be learned from industry veterans, but there also plenty of trail to blaze. 


12. You Don’t Have to Do Everything:

It’s good to know how to do things, but if you find yourself dreading a certain type of service- take it off the menu. While this may not be a reality if you work in a salon that offers many services, one of the benefits of working on my own is that I can set my own menu and attract the type of client that values those services. I specialize in gel nail art on natural nails, that’s all I do in my studio and I book out, every single month. I don’t do acrylic or pedicures; they just aren’t my bag.  

What can I say? Natural nails are my numero uno

What can I say? Natural nails are my numero uno

13. Advocate:

We are part of a much bigger picture, stay engaged in local and state politics- don’t get bamboozled. Don’t let a bunch of people (most of whom are old men have never worked in the beauty industry) choose your fate. Connect with your representatives don’t just sign a moveon.org petition or write a snarky post in your Facebook Nail Tech Group. 


tags: advice, pro tutorial, nail school
categories: Musings, Business Stuff
Thursday 05.28.20
Posted by Rachel Messick
Comments: 5
 

Blonde Torties Have More Fun

1 2.PNG

All it took was a global pandemic to get me focused on blogging, creating tutorials and editing videos. But the important thing is, I finally got here. It’s still a learning curve FOR SURE, but it’s starting to get a little easier. JUST A LITTLE.

As an artist and a woman, I can be pretty hard on myself. Especially in the world of ultra-glossy, warm-filtered world of social media. For better or worse, that gloss is part of the game and is an expectation. It’s just SO easy to get caught in the cogs of the machine. All of these are just general base feelings and not even factoring a busy schedule in the mix. While I definitely do not view almost three months of mandatory unemployment (California salons shut rapidly during the COVID-19 crisis) as an artistic retreat, it definitely allowed me to explore my art in a way I’ve not had time to do in a while and I gave myself permission to try new things, to fail and to learn.

I’ve been trying to master the blonde tortoise shell technique for about a year. Like, not a full year locked away in a tower like Howard Hughes. But like here and there. on and off, for a solid year. It took several tries to get this combo just right. Turns out the secret sauce was a swish of pale yellow at the base. It added just enough warmth to keep the design blended and nuanced.

It’s also super important to get the right shade of sheer brown, I use #261 (Jewel Umber) by Vetro and it’s pretty much my go-to hero sheer brown shade. It’s got this perfect mix of warm and cool, giving it a chameleon quality that seems to work with everything.


Here’s a breakdown of the products I used in the tutorial:

RiccaGel 186M

Vetro No.19 #261 Jewel Umber

Kokoist E-2 Maxi Black

Kokoist E-2 Maxi BlackKokoist & E-206S Black Martini

Presto Gel #3

Presto Non-Wipe Top Gel

Young Nails Master Gel Brush

Mana Nails x Nail Partner Liner Brush

PREGEL OB-5 Brush

As always, if you have any questions- feel free to leave them in the comments below! If you want to stay in-the-know connect with me on social media (links at the bottom of the page).

tags: tortoise shell, nail art, pro tutorial
categories: Pro Tutorial
Wednesday 05.27.20
Posted by Rachel Messick
 

Keep Calm and Press On

I’m so very excited about the new packaging for my press-on designs. After invading my husband’s home office to print out the old design several times a day, it was time to take the plunge, design something and get it printed professionally. 

I’ve been a big fan of Creative Market for years now and have used products from their designers for pretty much every project I’ve worked on for my business. You do need a bit pf photoshop know-how, but fortunately, there are SO many resources available online. I used MOO for the actual prints (they are 5x7 postcards if you’re curious) glossy on both sides.

The graphic straight out of the oven (photoshop).

The graphic straight out of the oven (photoshop).

Ready to go!

Ready to go!

tags: DIY
categories: Business Stuff
Wednesday 05.20.20
Posted by Rachel Messick
 

From Day Dream to Day Job

DSC_3778.jpg

Today is the one year anniversary of making the day dream the day job. If you know me or follow me on other forms of internet media, this isn’t a new story. It’s one that I tell often and will likely commemorate every year. Sometimes you spend your life trying to climb to the top of the ladder only to realize not only that you’re on the WRONG ladder, but that ladder is leaning against the WRONG wall too.

The corporate world was the final phase of my journey on the makeup side of the beauty industry. While I was in college, I saw a picture on IMDB of Orlando Bloom getting his makeup touched up and I was like, oh wait, there’s a career to be had in beauty SIGN ME UP. After college I moved to Los Angeles, went to makeup school and started working as a freelance makeup artist.

I never hit celeb status but I worked pretty consistently and had some amazing clients. Then I got older, truly out in my own and I got tired of chasing invoices (if you’re wondering when I became such a stickler about saving, planning and and running a small biz- it’s because in my 20s I literally made ALLL of the mistakes). So I thought, ok, new path, find a brand you can back and work your way up. I worked my way up from retail until I got that corporate dream job, a job that was LITERALLY made for me. But the problem is, the shoe just NEVER fit. I always felt like I just couldn’t GET corporate culture and to be honest corporate culture didn’t get me either. It took me YEARS to figure that out. It wasn’t all bad, I met some amazing people that will for sure be lifelong friends and I got to pretty much make New York a second home (speaking of New York, I’m long overdue for a visit).

Even though the corporate world and I were not good bedfellows, there was no doubt in my mine that I was meant to be in the beauty industry and to make my living as a creative and I just had to trust that the right path would present itself- I just had to follow my gut and trust the process. 


Years ago I became fascinated with nails and started buying all of the things, staying up all hours practicing, absorbing as much information available (thanks YouTube!) and it was SO fulfilling. But like, who leaves a cushy gig to trek into the great unknown. But, nailsmade my heart feel things I didn’t think I’d ever be able to feel again.

After doing some research, I found a local school that offered flexible scheduling and night classes. I finished, got licensed and the rest is history. It was the right ladder, the right wall and the right path. The later-in-life love that I found and was fortunate enough to make a reality. 


I also want to say THANK YOU to everybody in the industry that was so generous with sharing their knowledge, whether through online content, in-person classes, YouTube videos, email or just friendship in general. Thank you to the makeup artists from my past who were eager to bring me onto shoots and help me ease back into the industry. I honestly never thought I’d be on set again and once I got back, it was like I never left. It was HOME. Thank you to the photographers and fellow creatives that I’ve met and had instant soulmate friend connections with. Just all of it and all of YOU. I vow to always be generous with my knowledge and to do everything that I can to elevate this wonderful industry to its rightful place. 


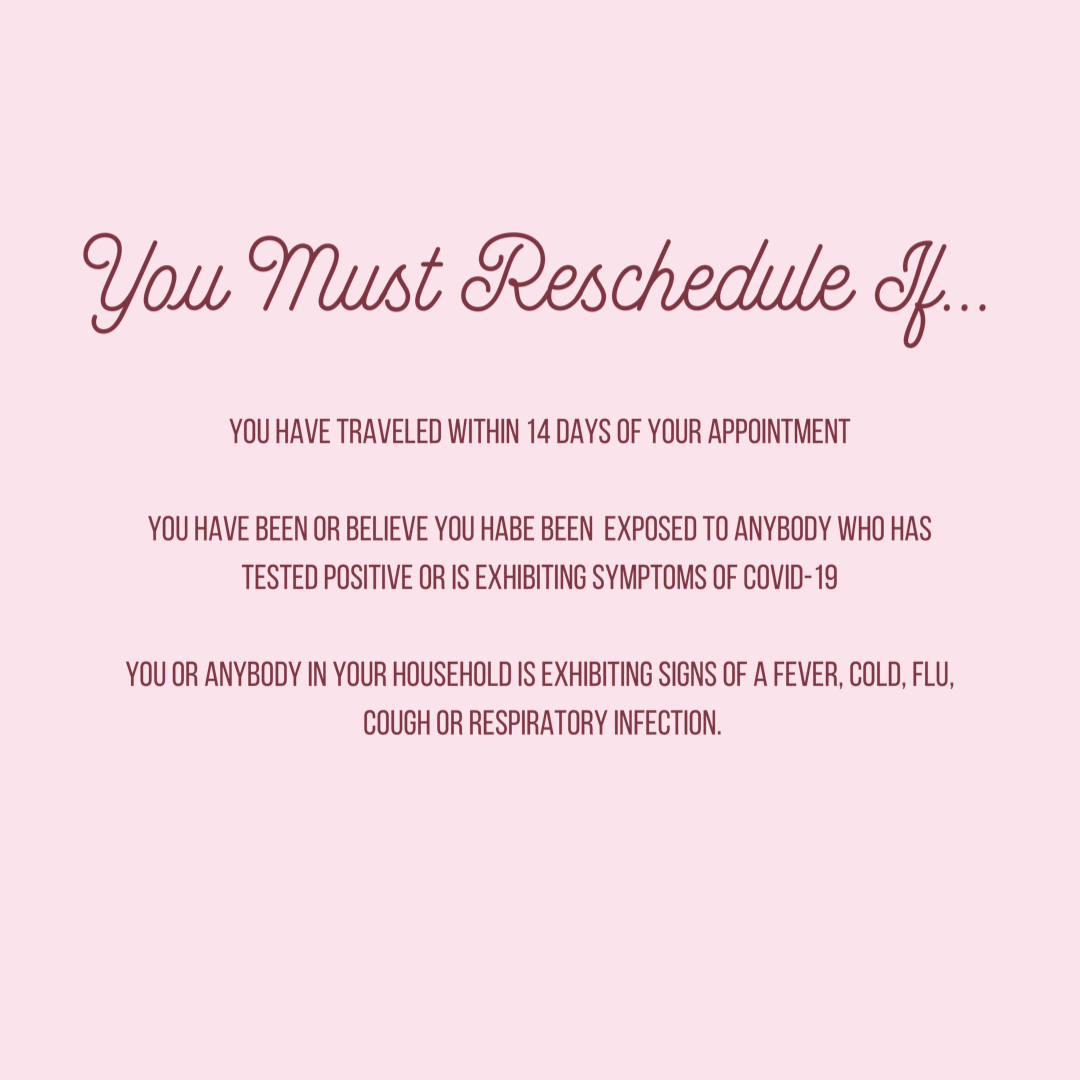
There’s a reason I’m a stickler and so passionate for the industry and our standing in it as manicurists, because I honestly don’t know what I’d be doing if I wasn’t a part of it. We’re in a place right now in America (and TBH the world) where everything feels topsy-turvy. California has been sheltering in place for MONTHS, I haven’t touched a client since mid-March will likely go another 2-3 months. While a pandemic is certainly not an artist retreat or motivational seminar, I’m doing my best and taking advantage of the downtime and trusting my instinct for adaptability.

Even with all of that, I still can’t picture myself doing anything else. Id’ rather be unemployed knowing that someday I’ll go back to holding hands with my clients and creating rad art. It took me a long time to get here. Making a career change in your thirties is hard- especially when it’s at a time in your life that expectations of other milestones are purported to give life as a woman meaning and purpose (i.e. getting pregnant and having kids). The only advice I can give is to just put in the work and trust yourself. Learn everything you can. Be generous. Follow your path and march to the beat of your own drummer. It’s worth it, I promise.

categories: Musings
Sunday 05.17.20
Posted by Rachel Messick
Comments: 1
 

I'M NOT A REGULAR AUNT, I'M A COOL AUNT

1.PNG

Eighties Paradise is one of the most popular styles in my shop. Originally based off a freestyle design I created for a client. It was inspired by that bygone gauche era of status, indulgence, excess and prosperity. Everybody had a cool aunt. You know the one, the cool condo, the car phone the mauve leather sofa and wicker coffee table. The aunt who totally let you watch Dirty Dancing even though your parents wouldn’t allow it, maybe she took you to get your ears pierced and taught you the most important rule of growing up: it’s better to apologize than ask permission.

While I definitely have cool aunts, I kept envisioning our next-door neighbor, my mom’s friend Rosalind Tallerico when I was creating this set. I was a pretty sheltered kid, so it was always fun to escape to her house and watch cool movies and pretend I was a teenager. She was stylish , tan and had big hair. Her house was ALWAYS perfection because her husband was always on the road for work. I remember getting a perm in her garage, yes I already had curly hair, but I wanted that perm SO BAD. Oh man, the 80’s/Early 90’s WHAT A TIME TO BE ALIVE.

Anyhow, back to the nails…

This look is unique, visually dynamic and also TOTALLY wearable. Even for clients that are a bit gun-shy about nail art will love it.

I filmed myself creating a full set of press-ons so that you'll get to see how I create a balanced and cohesive look on all ten nails. It will also give you insight on my process when it comes to selecting products, purposeful placement and balancing random elements.


I can't wait to see you recreate this look and put your own spin on it.


Feel free to leave any questions in the comments below.

Products used:

Presto Gel JC-3

Kokoist E-127 Strawberry Latte & E-196S Tulip Petals

Orly GelFX Builder-in-a-Bottle

Aprés Non-Wipe Topcoat

Princess Nails Rainbow Mylar

Young Nails Gold Foil

Riccagel Color Gel Brush

Young Nails Gel Sculptor Brush

tags: Tutorial, pro tutorial, mixed media design
categories: Pro Tutorial
Monday 05.11.20
Posted by Rachel Messick
 

Put the Lime In The Coconut In the Ombré

Untitled Design 3.PNG

As the days get longer and the sun shines a little brighter, I had to create a perfect sparkly neon green ombré to welcome SUMMER with open arms! Can you believe it? Wasn’t it December like a week ago?

Gel Ombré can be pretty intimidating and clients LOVE them. I’ve spent hundreds of dollars trying to find a hack (most notably an airbrush and airbrush gel that was a HOT mess) to do them quickly. But there really is something to be said for the old adage that practice matters. If you don’t get this right away, keep practicing and you’ll get it in time. Don’t let a fear of failure keep you from trying.

Whether we are doing our own nails or a clients' nails, our biggest roadblock will always be our own perfectionism. This is one of those looks where you have to not only trust your skill and product knowledge, but you also have to trust the process. We're doing ultra thin layers with highly pigmented gels, it's gonna work out. Promise.  If anything goes awry, just add extra glitter.

Just remember two things: 

  • Use purposeful placement and lay the bulk of the color down conservatively and where you want the most intensity. For an ombre like this, the intensity is going to be closer to the tip of the nail, so you'll notice whenever I go into the green, I work from tip upward.

  •   It's easier to ADD color than to remove it. Work with sheer thin layers and build up to the coverage that you want. It's easier to fix any mistakes that way.


Notes on the products I used:

 I discovered the Medusa gel line through a fellow manicurist and I'm SO impressed with the color pay-off and the product consistency- it's the PERF texture for this kind of art. If you're looking to do a black or white ombre (baby boomer), I recommend checking out Aeropuffing Gel Paste- it's the best I've found for those particularly challenging colors. 


 Products used:

Aprés Soft-Gel Full Cover Tip in Short Round Natural

 Miho Nails Melty Gelato 

Medusa's Nails Green 14 

Daily Charme Dreamy Fairy Dust 

Concelect/Britney Tokyo Square Head Brush 

Latex-Free Makeup Wedge 

Palette Knife 

Palette (this is a quartz coaster I got from Saje)

Make-up Brush, cleaned and free of debris 

BioSeaweed Gel No-Wipe Topcoat


tags: Nail Art, Tutorial, OMbre
categories: Pro Tutorial
Monday 05.11.20
Posted by Rachel Messick
 
Newer / Older

Powered by Squarespace.