• PORTFOLIO
  • ABOUT
  • PRESS
  • SALON APPOINTMENTS

Rachel Messick

manicurist

  • PORTFOLIO
  • ABOUT
  • PRESS
  • SALON APPOINTMENTS

Nail Art Tutorial: Abstract Lava Lamp

This post contains gifted product and/or affiliate commission codes/links. Click here for disclosure statement.

Ah yes, the delcious nebulous amorphic nature of the lava lamp. When I was a youth in the 90’s, 70’s nostalgia was in full swing. Claire’s accessories was selling beaded curtains and magic mushroom inspired tie dye candles (that I was NOT allowed to light) and you couldn’t pry daisy motifs and happy face t-shirts out of my ravenous teen hands. Suffice it to say, having a lava lamp was a major indicator of coolness.

View this post on Instagram

A post shared by Rachel Messick | Manicurist (@rachel.messick)

While there are definitely more on-the-nose lava lamp manicures out there, I’m more of a fan of a nod-and-wink approach to inspiration. What better way to modernize the lava lamp vibe than to throw in some #aestheticgirl details and a valentine’s adjacent color palette.

IMG_2043.jpg
IMG_2044.jpg
IMG_2045.jpg
IMG_2048.jpg

Step-by-Step:

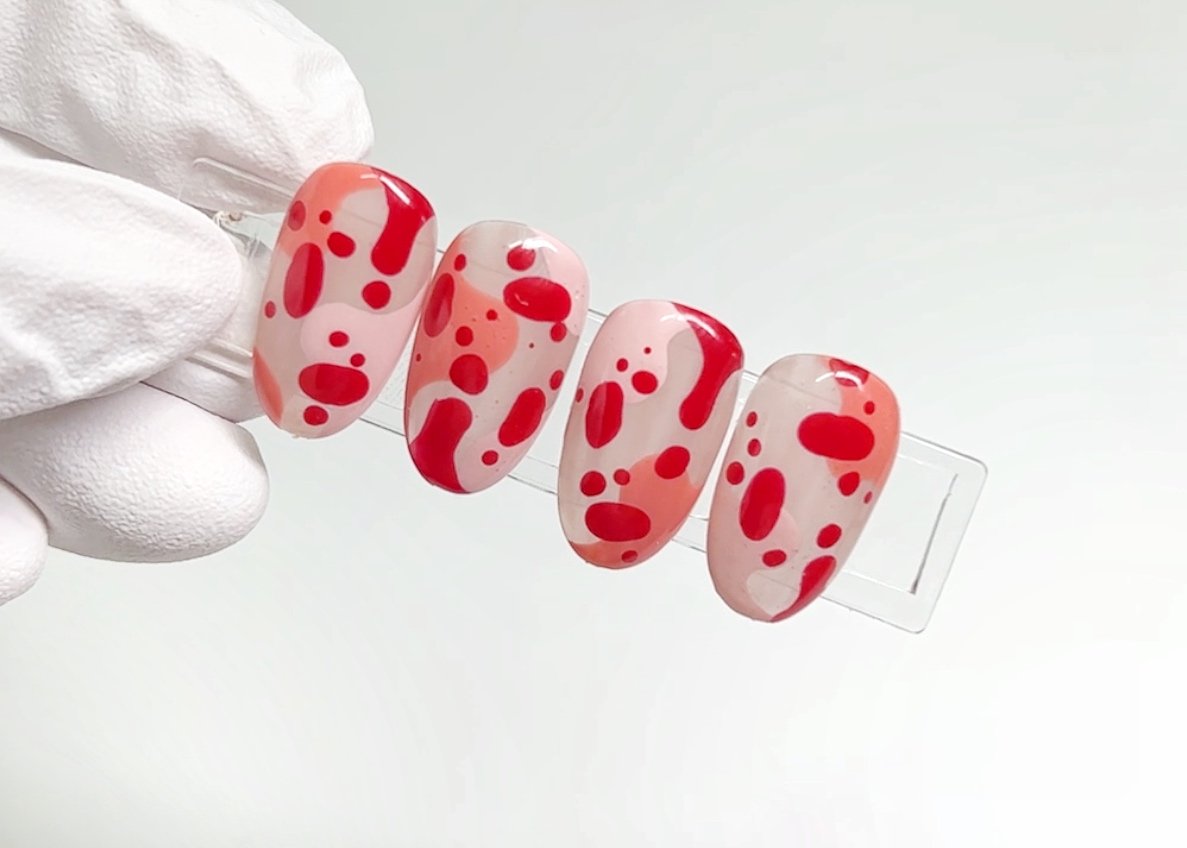
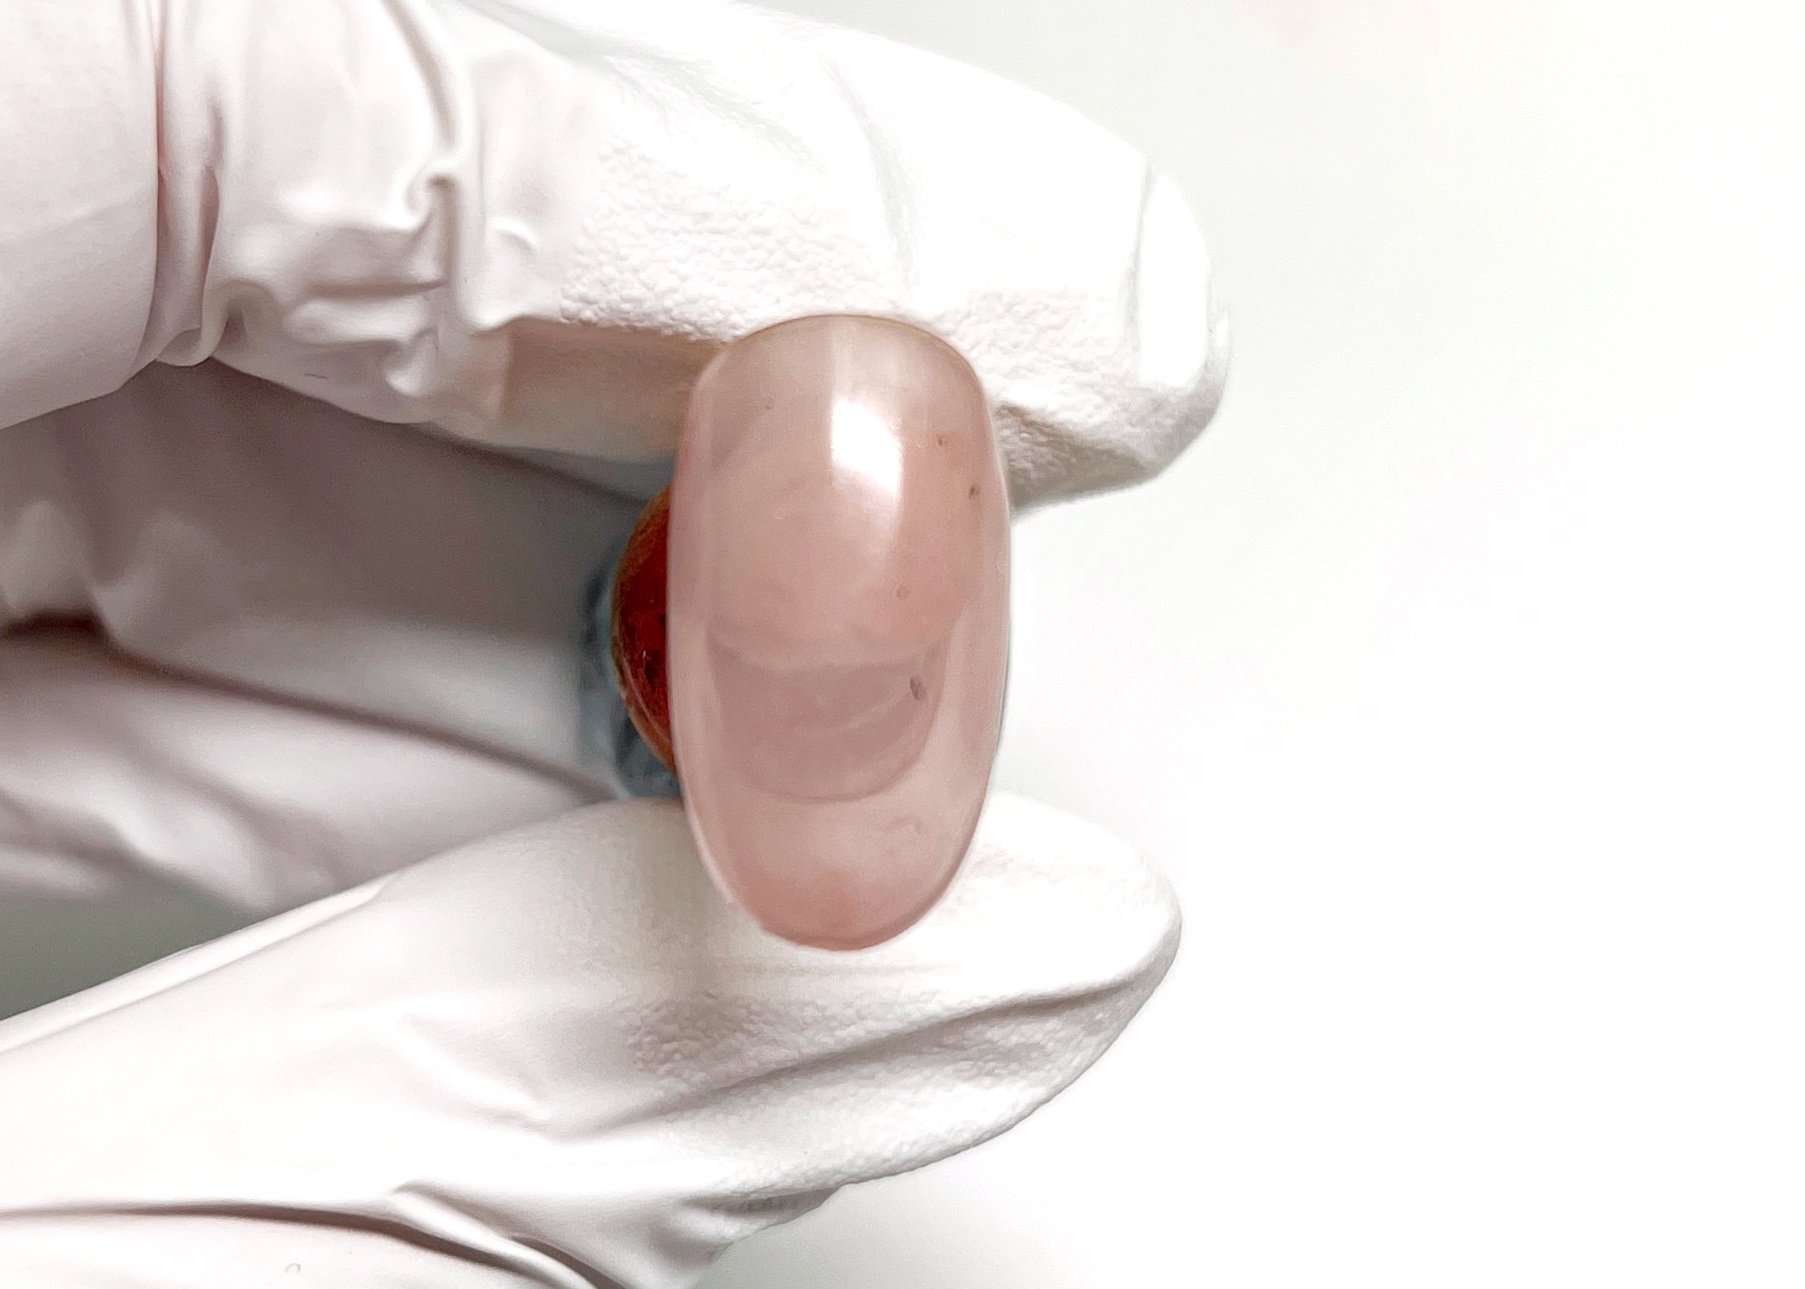
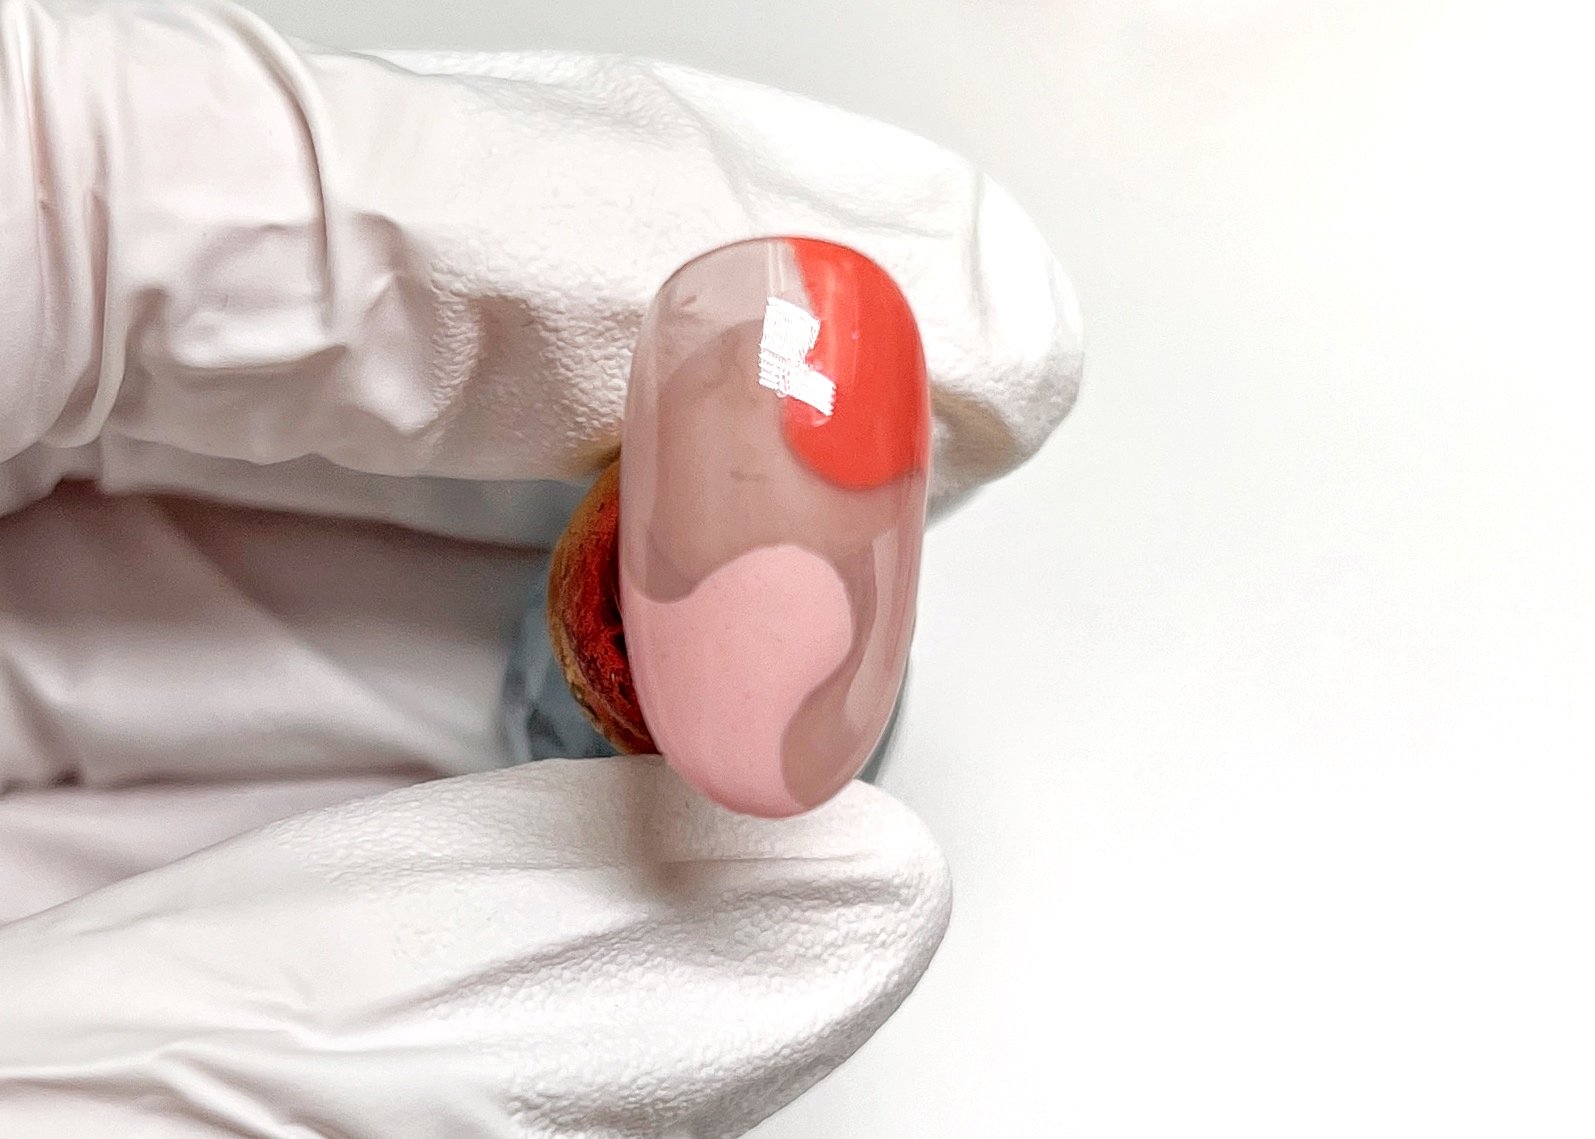
  • First things first, you’ll want to lay down two coats of E-175S Boysenberry Candy using you rapplication brush of choice (I’m using a Thin Round brush) curing between coats.

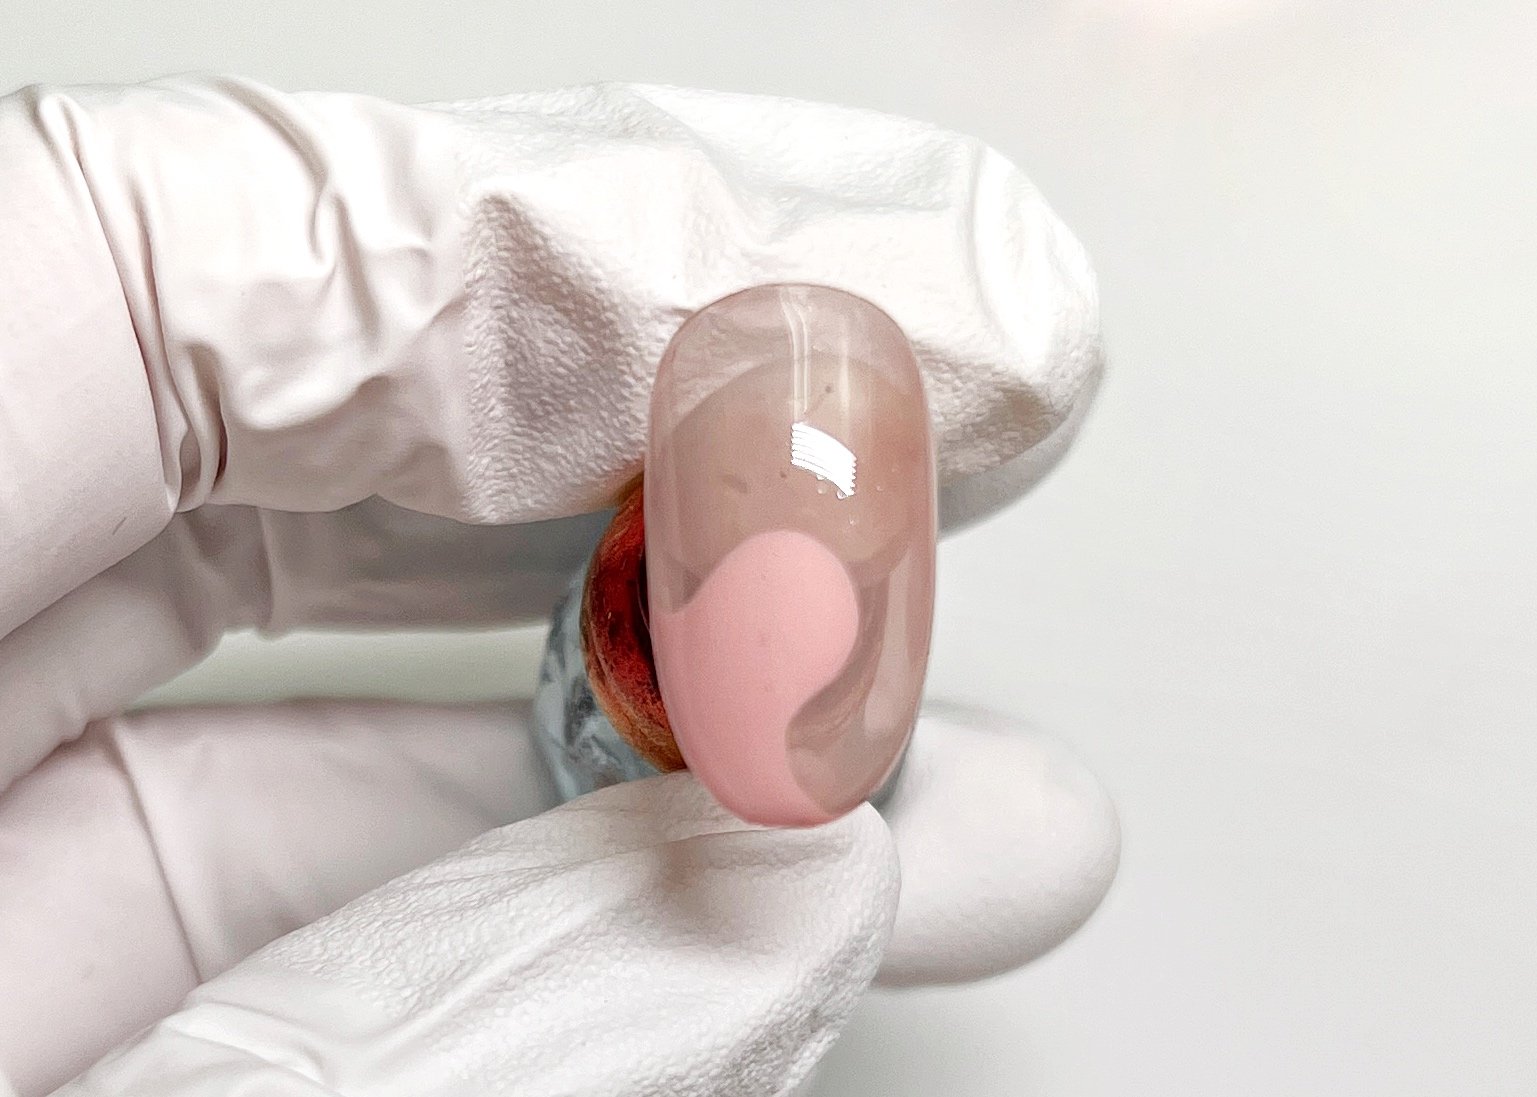
  • Using a detail brush create a larger abstract blob-shape with E-127 Strawberry Latte, cure.

  • Using the same techniue add another abstract blob of F Gel Color Gel #2 (a dusty coral), cure. Be careful going too thick with super pigmented bottled gels, they self-level really beautifully but it’s also easy to create a layer so thick it can’t properly cure.

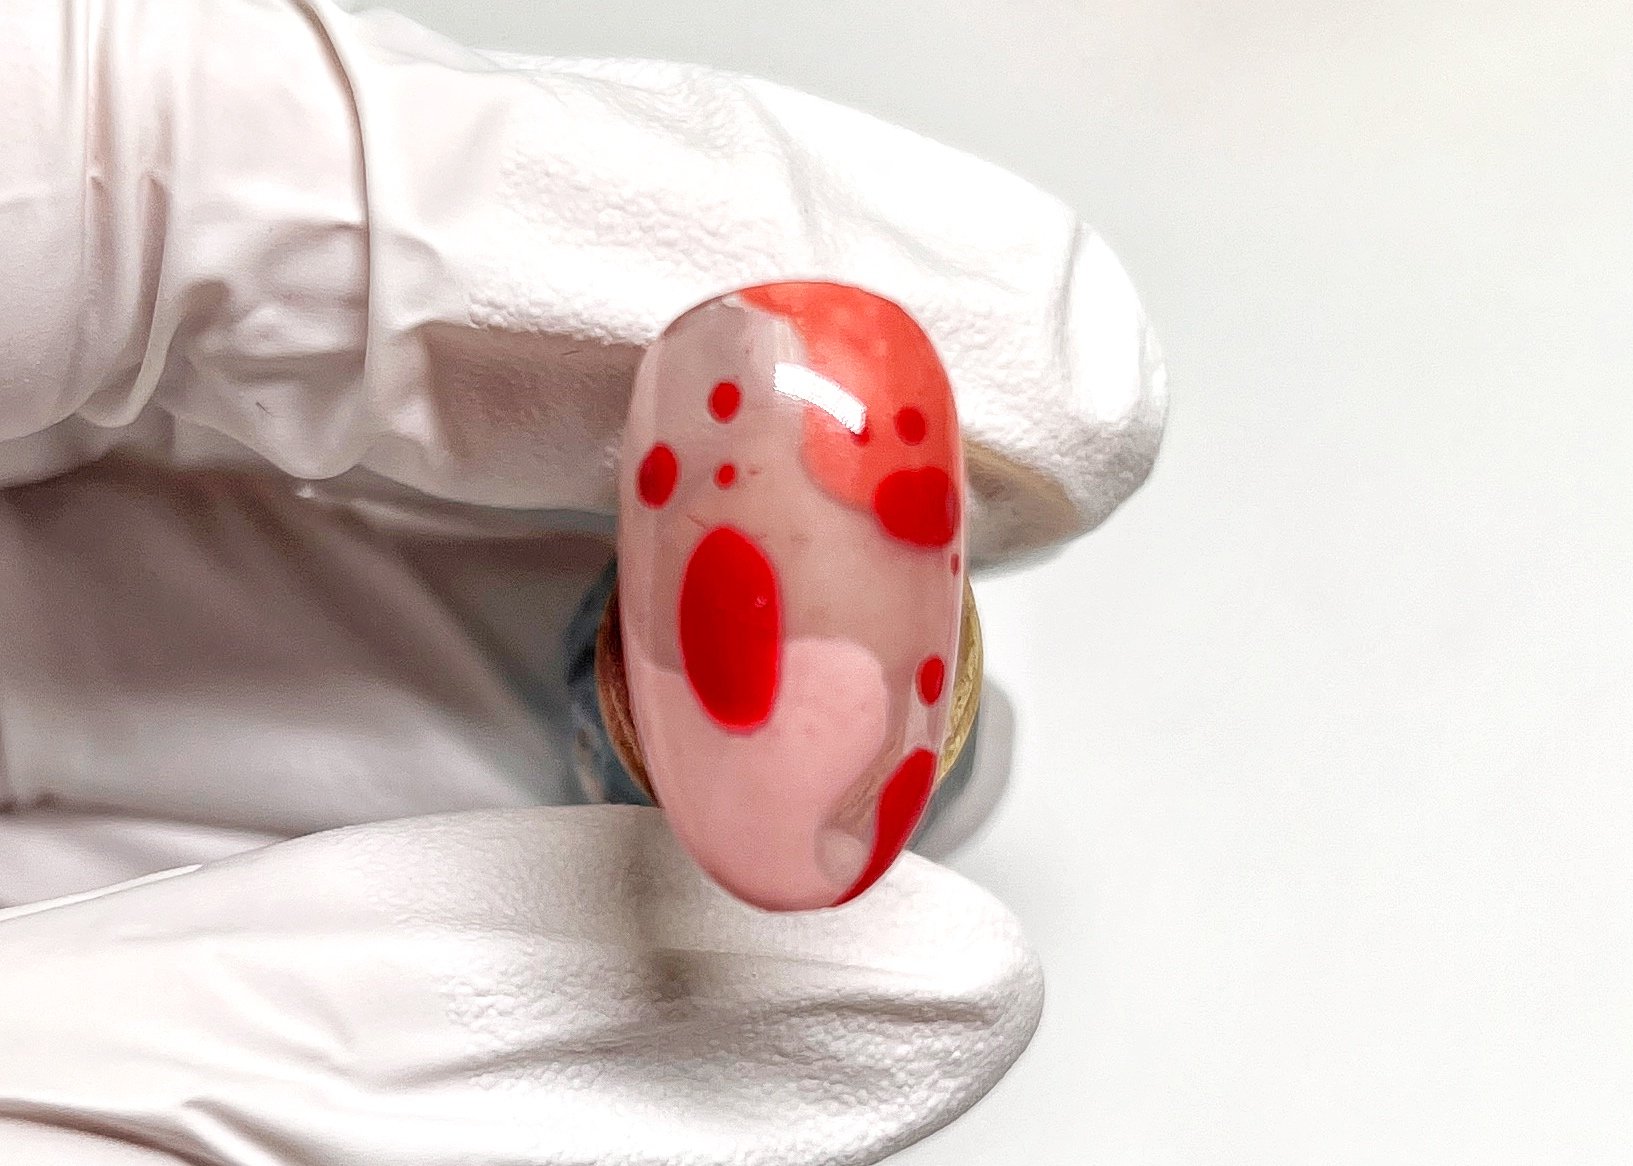
  • It’s ok to cure as you go with this next part, or if you like to live on-the edge and do it all at once- lmay the odds be ever in your favor. Using a dotting tool, start placing your larger oval-ish blobs first using F Gel Color Gel #53. This will help you ensure that you don’t overcrowd the nail and loose the floating lava lamp effect. Cure.

  • Now that you’ve placed the larger dots, go in and add additional dot detail. Cure.

  • Whenever I’m working with a raised design, I’ll always apply my top coat a bit more strategically. I always top coat on nail at a time. Using the Ultra Glossy Non-Wipe Top Coat Gel (say that 5 times fast, geez) I’ll scrub in a thin slip layer, ensuring that all the nooks and crannies are acocunted for. While that layer is wet, add a thicker layer of top gel and float it down the nail. Keep an eye on the line-of-light (the reflection of your table light) and watch it start to self level, be patient. Once the self leveling as starting you can start to attack problem areas- usually it’s going to be a little speed bump near the free-edge. Usually flipping the nail updise down for a few seconds and then dragging the product from the free edge to the apex does the trick (you can see me do it in the video).

  • Let your no-wipe top coat cool down for about 10 seconds, wipe it with a little alcohol (I use 70% or 99%) and then shine it up with some acetone. Turns out we should have been wiping these no-wipe top coats the whole time.

Use code RACHEL10 to save at Kokoist, Zillabeau (F Gel), My Nail Stuff, Hae Nails and Gellyfit.

These are affiliate links, meaning, at no additional cost to you I may recieve a commission if you choose to purchase using my links and/or discount code. Click for disclosure statement.


categories: Pro Tutorial, Musings, DIY
Sunday 02.05.23
Posted by Rachel Messick
 

Heart On Your Sleeve, Red On Your Fingers

This post contains product that was gifted for promotional consideration. For more information, please see disclosure statement.

IMG_7772.jpg

“Red, for valentines day, revol-uuuuu-tionary.” Listen ya’ll, we aren’t reinventing the wheel here; reds and pinks are forever favorites ANY season of the year. But today, TAH-DAY, we’re talking about my favorite hues for the month of love.

Whether you’re in it to win it with a class bold red or ready for something a little different with holographic pink glitter- I got you covered.

Sally Hansen Insta-Dry Nail Color in ASAP Apple ($4.50) - This one isn’t going to last the longest on your nails, but it’s a one and done- quick dry, gorgeous proper balanced red.

Dazzle Dry Nail Lacquer in Perfectly Plaid ($18) - This red is a little on the deeper side but you won’t find a longer lasting lacquer system on the market. It’s part of a system, so in order to get the long wear you’ll have to use the base and top coat as well but it’s definitely worth it.

Dazzle Dry Nail Lacquer in Soft Caress ($18) - A sweet lavender-toned cool pink, kind of reminds me of conversation hearts. This one is also part of the Dazzle Dry system as mentioned above.

Cirque Colors Nail Lacquer in Madder ($14) - Who doesn’t love a show-stopping HOLOGRAPHIC red. Yes, you heard right- it’s a red polish infused with super fine holographic flakes and trust me, when it catches the light it’s mesmerizing.

CND Vinylux Weekly Nail Polish in Pink Bikini ($14.50) - Literally, this is the perfect creamy pink. Bright, but not obnoxious and looks great on every skintone.

Essie Gel Couture in Rue De La Ruby ($11.50) - A perfect raspberry red for those that prefer a cooler tone to their reds. This collection as a whole is really impressive and I love the brush.

OPI Nail Lacquer in Big Apple Red ($9) - A true original favorite and probably the most perfect red to have ever have red. It’s fairly balanced, but leans a TOUCH to the warmer side of the color spectrum. This ones been in my bathroom vanity for at least a decade and you’ll have to pry it from my cold, dead hands if you want to take it from me.

Triple O Polish in Sirius A ($11) - Glitter polish is easily my favorite- it dries fast, is super duper forgiving and chips are hardly noticeable. This is the perfect pink sparkle to get you into the season.

IMG_7785.jpg


tags: nail polish, diy, valentines day
categories: Musings, Pro Tutorial
Monday 02.01.21
Posted by Rachel Messick
 

The Privilege in the Pivot

I could have also titled this blog post, how I became one of those Real Housewives with a bikini line that I’ve been snickering at for years without even knowing it.

As I was dialing in my income vs. expenses from last year on my beloved spreadsheet (Microsoft Excel for LIFE, she’s a lady in the streets and a freak in the spreadsheets) I was shocked at the amount of money I spent trying to “pivot” my business in this pandemic. Now, an easy way to temper this shock would have been to run my numbers bi-weekly or monthly throughout the year, but what can I say, turns out a pandemic, nebulousness from our governing body, mild depression and existential dread can leave a girl, uh, *unfocused*, to say the least. In a world that lives firmly planted in glossy existence of content creation and social media- you won’t see too many established artists willingly and publicly admit to hardships or shortcomings. So, I’ll start, for 2020, I ended my year $600 in the hole.

After running my numbers, I realized two things: 1) I need to stop convincing myself that shopping is manifesting and 2) what the f*ck would I have done if my husband wasn’t the breadwinner of our family. The first revelation, ok duh, I’ve had a shopping problem my whole working life regardless of my income level- so I’m not going to dive too much into that. The second revelation, crystalized in my mind the 2015 article by Aimee Groth for Quartz titled “Entrepreneurs don’t have a special gene for risk- they come from families with money.” Here’s a snippet:

“But what often gets lost in these conversations Is that the most common shared trait among entrepreneurs is access to financial capital- family money, an inheritance, a pedigree and connections that allow for access to financial stability. While it seems that entrepreneurs tend to have an admirable penchant for risk, it’s usually that access to money which allows them to take risks.”

Living in a country (the United States) that seems to value “pulling yourself up by your bootstraps” it’s kind of important to acknowledge that it’s easier to learn lessons when you can sit down in your house, drink a Nespresso and casually reflect on the past years’ choices, versus, let’s say, your car being repossessed because your pivot didn’t pan out. When I tell you I spent THOUSANDS trying to pivot my business, I’m really not joking. Whether it was press-on nails and stock for E-commerce, my fear that clients wouldn’t come back and I’d have to start offering pedicures, prepping my session kit for set work that didn’t materialize, bringing in new lines to the studio to appeal to different clientele and the list goes on and on and on. That’s not even taking into account that I had the means to stay compliant with the various state and regional closures, and never had to live/work in fear of being fined or sacrificing my health.

My whole career has been defined by a certain level of privilege, and I think it’s important to acknowledge that. Sure, I worked my butt off and put every skill I’ve acquired from life and business experience to hit the ground running- but my privilege had be starting the race at an advantage. I was able to walk away from a corporate job with a fat savings account that allowed me to pick-and-choose elite nail education, buy the best products and focus in a way that I may not have been able to if we depended on my income. My life has not always been financially stable or particularly charmed, however, I’ve always had a soft place to land, should I need to.

As somebody with influence (albeit minor) within our industry, the importance of transparency has become paramount, especially during hard times. If you are investing in your future and your business, you can and should be vetting your educators and influencers with a critical eye before investing. The social media landscape is a glossy place and it’s easy to feel left behind. Hang in there, you got this.

categories: Musings
Saturday 01.23.21
Posted by Rachel Messick
 

Streamline Series: Swatch It Like It's Hot

This post contains affiliate links, see my disclosure statement here.

IMG_8360.JPG

My studio was a swatch-free zone for a long time- I always hated the impersonal experience of going to the salon and pilfering through the basket of swatches or staring at a wall of polishes like the Sherwin Williams display at Home Depot. Without fail, I would just end up stressed out and say “uhhhh do you have Big Apple Red? From OPI?” and cross my fingers that the manicurist or front desk person knew what I was talking about. Suffice it to say, it was not the kind of high-end guided artistic collaboration I wanted to have with my clients.  

I always had an immense amount of pride in “knowing my collection” so if a client wanted a red, I wouldn’t show them EVERY red- I’d show them a few and then pare down from there or figure out what direction we wanted to go in without being overwhelmed by choice.

During the first round of closures out here in California, I had the epiphany- I didn’t have to choose one or the other, I can do both in a way that works for me and my artistic process.

Most importantly, it gave me something to do while my studio was closed. Swatching my gels gave me new perspective on my collection- it helped me realize what colors I was buying too often and what colors/finishes were lacking. I also found these amazing swatch palettes at my local nail supply (so if you’re in Orange County, you can grab them at Skylark- if you’re not, here’s an Amazon link) that were wayyyyy less cumbersome than traditional swatch sticks.  

With the new COVID safety guidelines (although, not all that different from how I already ran my studio) came out- streamlining my appointment timing became paramount. Then the epiphany happened:  I should put these online. By putting my swatches online, my clients won’t feel the swatch stress in my studio, and neither of us will have to pour over which pink is the “right pink” for twenty minutes of an hour appointment. Which, TBH, will still happen from time to time (you know who you are).

So it’s a new year, a new opportunity to streamline and work smarter. What steps are you taking in the new year to streamline your service experience?

Here are some links to products that have helped me streamline my swatch process:

36 Color Swatch Palette

Dymo LabelManager Label Maker

1/4 Inch Black on Clear Label Tape

Ball-Chain Connector Clasp

Ageha Non-Wipe Top Gel for Sample Tip

BioSeaweed No Tipe Top Coat

IBD Powerbond Gel Bonder

tags: swatches, gel, client service
categories: Pro Tutorial, Musings, Salon
Monday 01.18.21
Posted by Rachel Messick
 

Send Nudes

This post contains affiliate links, see my disclosure statement here.

FullSizeRender 4.jpg

Let’s talk about nudes. No, not those kind. Get your brain out of the gutter. I’m talking about real-life human toned nude nail polishes for my people with medium to deep skintones. While truly there are no rules to color and you should one-hundred-million-kajillion percent wear whatever colors bring a smile to your face- I also understand that when it comes to deeper skin tones, finding an amazing nude shade can be a challenge. While the list below are my personal favorites that I actually own and carry in my kit, I’m so happy to see the call for better nudes is no longer going unanswered.

As you may know, I spent a good portion of my adult life as a make-up artist before I ever ventured into nails. So i’ve been on the quest to find and curate a good selection of foundation-type nudes to share with you all.

Why not the light nude shades? Frankly, there’s no shortage of light-toned nude shades with high name and brand recognition (for example: Essie’s Ballet Slippers, Bubble Bath and Samoan Sand by OPI- just to name a few). True, one does not have to match those shades to wear them- it’s nice to have the option of a true-to-you nude for everybody.

Warm Shades

FullSizeRender 3.jpg

These cuties will lean more towards a red or plummy undertone (think more of the NW foundations at MAC or the R family with MAKE UP FOREVER).

OPI Nail Lacquer in Chocolate Mousse ($10)

OPI Nail Lacquer in Shhh… It’s Top Secret ($10)

Essie Nail Lacquer in Cocoa Karma ($9)

Floss Gloss Nail Lacquer in Blood, Suede and Tears ($9)

Triple O Polish in Fon ($11)

CND Vinylux Weekly Nail Polish in Clay Canyon ($11)

People of Color Beauty Nail Lacquer in Mother of Earth ($12)

People of Color Beauty in Brown Sugar Babe ($12)

Cool Shades

These cuties are for my cool toned olive/yellow babes- thing C or NC shades at MAC or the Y family with MAKE UP FOR EVER.

Mented Cosmetics Nail Lacquer in Brown & Bougie ($8)

Mented Cosmetics Nail Lacquer in yes We Tan ($8)

Zoya Professional Lacquer in Kateri ($10)

Kiara Sky Professional Nail Lacquer in Treasure the Night ($8.50)

Tripe O Polish in Nok ($11)

Essie Expressie Quick-Dry Nail Polish in Cold Brew Crew ($9)

Zoya Professional Lacquer in Desiree ($10)


tags: nude nails, nail polish
categories: Musings
Monday 01.04.21
Posted by Rachel Messick
 

Taking a (Gel) Break

My clients nails, after removing a Luminary Overlay in preparation for California salon closure.

My clients nails, after removing a Luminary Overlay in preparation for California salon closure.

Taking a gel break is a pretty common occurrence- but not for the reasons that most people would attribute. While there are many reasons you may choose to take a “gel break.” This year alone has forced a lot of us to do so. Do I think it’s the “death of the manicure?” Absolutely not. Let’s start with the elephant firmly planted firmly in the middle of the room: your nails don’t breathe and don’t require a break. Nails get all of their oxygen from your blood stream. Assuming you are using high quality and regulated nail products and are not currently experiencing an allergic reaction- you’re good as gold to continue to glam those phalanges to your hearts content. 

 Some of the reasons you may decide to take a gel break: 

 Salons are closed: This one hit A LOT of us this year. None of us thought a mandated salon closure would ever happen, let alone happen on and off all year. Many of us got stuck glued to YouTube trying to figure out how to take off our nails. 

 You’re unable to keep a maintenance schedule: Maybe you’re going backpacking through Europe for months. Maybe funds are tight, and nails aren’t an expense you can justify. Maybe you just had a baby and the idea of leaving your kid alone for a couple hours is stressing you TF out. Your reasons are your own, and that’s okay- we’ll be glad to see you when you’re ready to come back. 

Your nail plate is seriously damaged: I’m not talking about a few scratches here and there, I’m talking filed into oblivion or you literally slammed your nails into a car door. Maybe you’re on a new medication that’s throwing your hormones out of whack or seriously affecting prosuct adhesion. Depending on the type of damage, taking a break may be a requirement rather than a choice.

You had an allergic reaction: If your nails are itchy, red, blistered, peeling and/or tender. Go see a doctor ASAP. While it’s not our place as beauty professionals to diagnose, if something doesn’t feel right- it likely isn’t and you should get it checked out by a doctor. You will likely need to take a break and figure out exactly what ingredients are causing a reaction. I can’t stress this enough, you do NOT want to lollygag when it comes to allergic reactions- if you’re a manicurist contact allergies can end your career and if you’re a client you could eventually find yourself allergic to many ingredients if you let allergic reactions go uninvestigated and untreated.  

 Personally, I decided to take a gel break for the month of December. I had a full schedule (also lol because we ended up getting shut down AGAIN in California) and just didn’t want to have to baby my nails or deal with gel maintenance on myself. When I am off duty  I want to be OFF DUTY- not sitting at my nail desk after hours fixing a nail or rebalancing an overlay on myself. God bless my nail friends that can go 6 weeks between manicures, but, I’m a solid 2-weeker, maybe 3 weeks MAX and that’s pushing it. As a side note, I also do not recommend filing off your gel over your kitchen trashcan after a few glasses of wine at like 9pm on a Sunday. Seriously, there’s a reason I don’t do my gels at home- I’m way too impatient. Anyhow, I DIGRESS….

So you’ve decided it’s time for a gel break- what now? 

Gentle Product Removal: If you are unable to see your manicurist for a full removal. Plan on spending some time (it can take hours) to gently remove your gel the right way. You’ll want to file the surface of the gel with a gritty file, try to get through as much color as possible until you see the base coat. Once you get to the base coat, saturate a cotton ball in acetone and wrap it firmly in foil (or plastic removal clippies) and just wait. Don’t even check your nails before the 10 minute mark. Check your nails, see what product is ready to let go (don’t force it) and gently push the gel downwards with a orangewood stick or cuticle pusher. You can file a little more down and then wrap it again and soak again. Repeat until the product had released. 

Cut it down: Unless you are one of those freaks of nature who can grow out their natural nails without any problem or breakage- you’re going to need to take them shorter. Remember, you can always shorten length but you can’t add length if you cut too short. Trim your nails with clippers and they using a medium/fine grit file (180 or 240) working from the outside in a single direction (don’t saw your natural nails) gently shape your nails. 

 Push back your cuticles: Pushing back cuticles a few times a week (with a gentle cuticle pusher) will help keep excess cuticle growth at bay. Since most of us don’t want to sit with our hands in cereal bowls filled with warm soapy water, I recommend pushing them back after you get out of the bath or a shower. Easy Peasy. 

Cuticle oil is your new religion: Repeat after me, in cuticle oil we trust. Twice a day, but in reality, you can’t do it too much. If you’re having trouble sticking to a schedule- apply it alongside your skincare routine. Personally, I just have it in various common areas around my house, in my purse and in my car. I’ve been known to apply cuticle oil at stoplights, no judgement. Amen. 

Avoid excessive treatments: Nail strengtheners are an interesting product, but truthfully very few people actually need them and they tend to do more harm than good and can actually cause your nails to be more brittle over time. Truthfully, eating nutritious foods, drinking water and using cuticle oil is the perfect recipe for healthy nails. If you want more I recommend the OPI Gel Break System- it’s pretty gentle and looks natural. Personally, I just opt for regular-schmegular nail polish when I’m taking a break- it kinda brings back that spark-of-joy I felt when I was a teenager and discovered glitter polish

Whether your gel break was intentional or unintentional- I’ll be on the sidelines cheering you on and when you’re ready to get back into the salon, don’t worry- we’re not going anywhere. #longlivethemani

tags: gel break, diy
categories: Musings
Monday 12.21.20
Posted by Rachel Messick
Comments: 1
 

Things I Wish I Knew: Advice for New and Aspiring Manicurists

IMG_2521.JPG

1. Nail School Is Not the Real World: 

 The goal of nail school is for you to finish nail school. Period, end of story. 

 It’s to teach you the basics of the Milady text and to help you pass the state board. Some schools offer upgraded programs (my school had the basic 400 hours and then an advanced 600 hours)- don’t waste your time, just take the basics. Connect with your instructors;  ask questions and pay attention,  usually if they see you are serious and interested they will invest more in you. One of my instructors, Jackie, was absolutely instrumental and crucial to me passing the State Board exam and I still consider her a friend. 

 Another thing to consider,  it’s not uncommon for cosmetology instructors to be scouted as students and put straight through an instructor program as soon as they graduate. It stands to reason, you could have an instructor with very limited real-world salon or business experience. 

 You’re better off investing the money you didn’t spend upgrading your program on great, focused and refined education taught by professional artists and educators (more on that below). In additional to the amazing (and FREE) resources available on the internet there are also many reputable in person one-on-one educators and brand/technique certifications.

That being said, nail school is GREAT for learning how to interact with clients. Do yourself a favor and let it be known to your instructors that you WANT to work with clients. 

A standard mock State Board Practical Exam set up.

A standard mock State Board Practical Exam set up.


2. The Learning (And Practicing) Never Stops: 

Don’t get it twisted, in the beauty biz we are lifelong students. There will always be new products and techniques to master and ways to be better. However, it is SO important to do your research, ask your peers about the classes they’ve taken and their opinions on them. It’s surprisingly easy to weed out the duds if you just take the time to chat with your peers. I can personally vouch for several programs and educators, if you’d like to see that in a future post let me know in the comments! 

IMG_9522 2.JPG


3. Build A Community:  

There is room for everybody at the top. While it’s natural to feel competitive, comparison is the thief of joy. You won’t be everybody’s cup of tea and everybody won’t be your cup of tea- don’t force it. it’s important to be a part of a like-minded community. I love that I have an amazing world-wide network of fellow manicurists that I can bounce ideas off, give advice to or ask for advice from. Nail friends just make everything better. 

Taking classes are a great way to meet fellow manicurists AND to learn new skills- WIN WIN! This picture was taken at Katie’s Masterclass and I now count all of these ladies as friends! Left to Right: Sandy (@beachgirlmani), Katie (@nailthoughts), B…

Taking classes are a great way to meet fellow manicurists AND to learn new skills- WIN WIN! This picture was taken at Katie’s Masterclass and I now count all of these ladies as friends! Left to Right: Sandy (@beachgirlmani), Katie (@nailthoughts), Brittany (@nailsnybrittany), Gwen (@hausofglewis_nails) and me (@rachel.messick) featuring some very dusty pants.

4. Buy It Nice or Buy It Twice:

Not to be like, a super snob but please don’t buy weird gel off amazon- if a gel is $1, that’s exactly what it’s worth. It doesn’t matter if you can get 100 colors for $50, most of that product is of questionable origin and can cause some serious allergic reactions. Product allergies are VERY real and can end your career QUICK. Buy from reputable brands that can provide you with SDS/MSDS sheets that can vouch for their product.

5. Products Are Not a Substitute for Skill:

If they were, we would all be out of a job. Remember the first time you did a gel manicure- yeah, it’s a LOT harder than it looks, it probably took you two hours and fell off the next day in the shower. There is no product in the world that will make you a good nail artist. There are products that can simplify certain tasks. There are products and tools that can elevate the work of a good artist. There is no substitute for skill. 

I traveled a state over to take this class- when the educators are amazing it’s WORTH it. This was a joint Erica’s ATA & Luminary Certification with Candice Green and Hillary Hererra.

I traveled a state over to take this class- when the educators are amazing it’s WORTH it. This was a joint Erica’s ATA & Luminary Certification with Candice Green and Hilary Hererra.


6. People Skills Matter:

People are the heartbeat of our profession- it’s imperative to learn how to read the room, when to speak, when to listen and how to navigate a conversation. Chances are, if you choose this profession, you probably like people- so you’re already halfway there.  


7. How You Represent Yourself Matters:

We live in a different world today; your image consists of much more than your outfit. It’s about an experience. Keep things consistent every space that you represent yourself. We have more access to each other than ever- be yourself and have fun but keep it intentional and professional. You never know who’s watching. I highly recommend keeping separate personal social media pages and choosing very wisely who you allow into that space. 


Very engaging Young Nails One Week Course

Very engaging Young Nails One Week Course

 8. Know your Cost Per Service:

Don’t base your prices on what the salon down the street is charging. Know how much it actually costs you to perform a service, what you’d like to make an hour and your overhead. You can definitely look at what other artists are doing and how they structure their services, but at the end of the day you need to do what makes the most sense for YOU.

9. Create Boundaries:

Clients are not bad or naughty, however, it’s important for your well-being that boundaries are set and respected. People treat you how you allow them to. Do not, I repeat, do NOT wait to set personal and professional boundaries. Scheduling, safety guidelines, contact guidelines and preferences, late fees, no show fees, etc.…  You’d be surprised how much mutual respect is achieved when you set boundaries.

ACS_0002.JPG

 10. The Beauty Business Is Still a Business:

It does not matter if you are an employee or a business owner, the only person who is responsible for YOUR business is YOU. That means making sure you know the ins-and-outs of the state and local guidelines/laws. That you are saving money for taxes and managing your business expenses. Get an EIN and a business checking, savings and credit card. Make sure you have appropriate liability insurance. Read all the fine print. Know your rights. Don’t get taken advantage of by shady salon owners.This business is the BEST, but it is a BUSINESS- don’t EVER forget that. 


11. Don’t Be Afraid to Blaze Your Own Trail:

There are a lot of veteran manicurists with very strong opinions, some antiquated, some not. That’s ok. There are vets that won’t touch a product, no matter how good it is, if the product is retailed to the general public. There are vets that believe you should only use one and only one product line. There are vets that believe that hand-filing is the only way to file. This is an ever-changing industry and there is much to be learned from industry veterans, but there also plenty of trail to blaze. 


12. You Don’t Have to Do Everything:

It’s good to know how to do things, but if you find yourself dreading a certain type of service- take it off the menu. While this may not be a reality if you work in a salon that offers many services, one of the benefits of working on my own is that I can set my own menu and attract the type of client that values those services. I specialize in gel nail art on natural nails, that’s all I do in my studio and I book out, every single month. I don’t do acrylic or pedicures; they just aren’t my bag.  

What can I say? Natural nails are my numero uno

What can I say? Natural nails are my numero uno

13. Advocate:

We are part of a much bigger picture, stay engaged in local and state politics- don’t get bamboozled. Don’t let a bunch of people (most of whom are old men have never worked in the beauty industry) choose your fate. Connect with your representatives don’t just sign a moveon.org petition or write a snarky post in your Facebook Nail Tech Group. 


tags: advice, pro tutorial, nail school
categories: Musings, Business Stuff
Thursday 05.28.20
Posted by Rachel Messick
Comments: 5
 

From Day Dream to Day Job

DSC_3778.jpg

Today is the one year anniversary of making the day dream the day job. If you know me or follow me on other forms of internet media, this isn’t a new story. It’s one that I tell often and will likely commemorate every year. Sometimes you spend your life trying to climb to the top of the ladder only to realize not only that you’re on the WRONG ladder, but that ladder is leaning against the WRONG wall too.

The corporate world was the final phase of my journey on the makeup side of the beauty industry. While I was in college, I saw a picture on IMDB of Orlando Bloom getting his makeup touched up and I was like, oh wait, there’s a career to be had in beauty SIGN ME UP. After college I moved to Los Angeles, went to makeup school and started working as a freelance makeup artist.

I never hit celeb status but I worked pretty consistently and had some amazing clients. Then I got older, truly out in my own and I got tired of chasing invoices (if you’re wondering when I became such a stickler about saving, planning and and running a small biz- it’s because in my 20s I literally made ALLL of the mistakes). So I thought, ok, new path, find a brand you can back and work your way up. I worked my way up from retail until I got that corporate dream job, a job that was LITERALLY made for me. But the problem is, the shoe just NEVER fit. I always felt like I just couldn’t GET corporate culture and to be honest corporate culture didn’t get me either. It took me YEARS to figure that out. It wasn’t all bad, I met some amazing people that will for sure be lifelong friends and I got to pretty much make New York a second home (speaking of New York, I’m long overdue for a visit).

Even though the corporate world and I were not good bedfellows, there was no doubt in my mine that I was meant to be in the beauty industry and to make my living as a creative and I just had to trust that the right path would present itself- I just had to follow my gut and trust the process. 


Years ago I became fascinated with nails and started buying all of the things, staying up all hours practicing, absorbing as much information available (thanks YouTube!) and it was SO fulfilling. But like, who leaves a cushy gig to trek into the great unknown. But, nailsmade my heart feel things I didn’t think I’d ever be able to feel again.

After doing some research, I found a local school that offered flexible scheduling and night classes. I finished, got licensed and the rest is history. It was the right ladder, the right wall and the right path. The later-in-life love that I found and was fortunate enough to make a reality. 


I also want to say THANK YOU to everybody in the industry that was so generous with sharing their knowledge, whether through online content, in-person classes, YouTube videos, email or just friendship in general. Thank you to the makeup artists from my past who were eager to bring me onto shoots and help me ease back into the industry. I honestly never thought I’d be on set again and once I got back, it was like I never left. It was HOME. Thank you to the photographers and fellow creatives that I’ve met and had instant soulmate friend connections with. Just all of it and all of YOU. I vow to always be generous with my knowledge and to do everything that I can to elevate this wonderful industry to its rightful place. 


There’s a reason I’m a stickler and so passionate for the industry and our standing in it as manicurists, because I honestly don’t know what I’d be doing if I wasn’t a part of it. We’re in a place right now in America (and TBH the world) where everything feels topsy-turvy. California has been sheltering in place for MONTHS, I haven’t touched a client since mid-March will likely go another 2-3 months. While a pandemic is certainly not an artist retreat or motivational seminar, I’m doing my best and taking advantage of the downtime and trusting my instinct for adaptability.

Even with all of that, I still can’t picture myself doing anything else. Id’ rather be unemployed knowing that someday I’ll go back to holding hands with my clients and creating rad art. It took me a long time to get here. Making a career change in your thirties is hard- especially when it’s at a time in your life that expectations of other milestones are purported to give life as a woman meaning and purpose (i.e. getting pregnant and having kids). The only advice I can give is to just put in the work and trust yourself. Learn everything you can. Be generous. Follow your path and march to the beat of your own drummer. It’s worth it, I promise.

categories: Musings
Sunday 05.17.20
Posted by Rachel Messick
Comments: 1
 

Powered by Squarespace.